Select your country
Depending on the country/region, our gross prices may differ.
- Home
-
Repair
- Dart Machines
-
Dart Machine Parts
Lion darts
- All spare parts - Löwen Dart
- Lion darts - complete set
- Disc, segments, spider, catch ring
- Matrix rubber mat T-molding
- Eprom RAM battery
- Sticker, film, casing, starting line
- Cables, speakers, screws
- Electronics, circuit board, power supply
- Button: Leo, 301...
- Lighting, fuses
- Drop line
- Lock
- IR sensor infrared
- Display display cover
- Missed throw sensor piezo kit
- Coin validator + programming
- Lion Dart Cougar HB8 HB9 HB10
- Lion Dart 2000 - Vision
- Lion Dart SM92/94
- Lion Dart FM90
- Lions Royal 86 without cricket
- Lions Royal 86 with cricket
- Idea lion dart
- Dart Shop
- Coin Validator
- Rental
- Vouchers
- Contact us
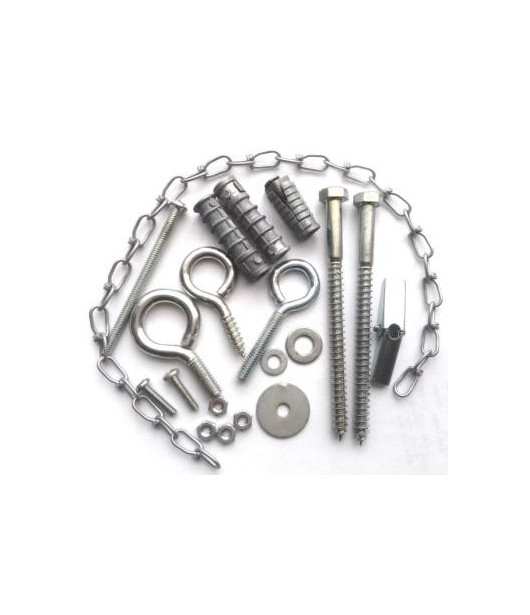
The wall mount consists of individual parts for different types of attachment:
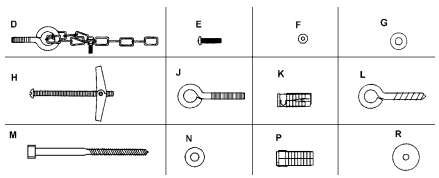
D: Eyebolt with chain
E: screw
Q: Mother
G: U-disk
H: Tilt dowel
J: eyebolt
K: Wall dowels
L: Wood eyebolt
M screw
N: U-disk
P ground dowel
R: fender washer
1. Fastening the eyebolt 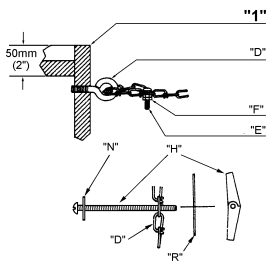 with chain on the top part of the device
Screw the eyebolt with chain "D" into the center of the rear wall of the upper part of the device.
2. Attach the chain to the wall according to instructions A, B or C
A Cavity wall fastening
- Place the device in playing position and mark a point on the wall in a direct line to the eyebolt and chain on the back of the device.
- Drill a hole, diameter 12.5 mm, at the marked point.
- Unscrew screw "H" from the toggle dowel.
- Assemble the toggle dowel in the order: washer "N", chain, fender washer "R", dowel wing
- Insert the tilting dowel with the wings folded into the drilled hole and tighten the screw "H". When assembled, the chain should only have a small amount of slack.
 |
B Solid wall, concrete, brick pumice etc.
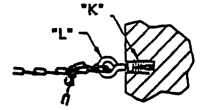
- Place the device in playing position and mark a point on the wall in a direct line to the eyebolt and chain on the back of the device.
- Drill a hole, 6mm diameter, approximately 35mm deep at the marked point.
- Insert the wall dowel "K" into the drilled hole and screw in the eyebolt "L".
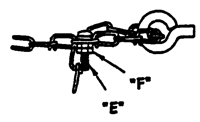
- Pass the chain through the eyebolt and screw the chain with screw "E" and hexagon nut "F" as shown. When assembled, the chain should only have a small amount of slack.
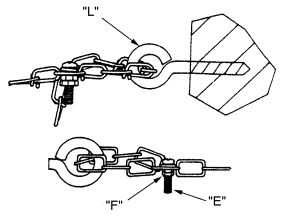
C wooden walls
1. Place the device in playing position and mark a point on the wall in direct line to the eyebolt and chain on the back of the device.
2. Screw the eyebolt "L" into the wall at the marked location. (pre-drill if necessary)
3. Pass the chain through the eyebolt and screw the chain with screw "E" and hexagon nuts "F" as shown. When assembled, the chain should only have a small amount of slack.
Fixing to the floor
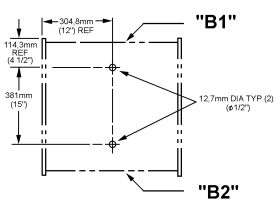
Attachment to the concrete floor
1. Mark the two specified screw points on the floor; according to the dimensional drawing. ("B1"=back of the housing reference line, "B2"=front of the housing relative to the mounting holes).
2. Drill the holes at the marked locations approximately 45 mm deep using a 12.5 mm masonry drill bit.
3. Insert the ground dowels "P" into the holes.
4. Now place the device with the holes exactly over the floor dowels.
5. Secure it with washers “N” and screws “M”.
6. Screw screws "M" into the bottom of the housing until the screws are flush with the bottom. 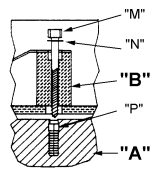
Attachment to the wooden floor
1. Place the device in playing position.
2. Secure it with washers "N" and screws "M" (Note: Pre-drill with a 6mm wood drill if necessary).
3. Screw screws "M" into the bottom of the housing until the screws are flush with the bottom.
- Item condition:
- New
No carriers available for this product.

